Running APPIUM, for iOS and Android mobile automation testing
1.1 What is Appium?
Appium is an open source test automation tool developed and supported by Sauce Labs to automate native and hybrid mobile apps. It is basically know as a Cross-Platform Mobile Automation Tool. It uses JSON wire protocol internally to interact with iOS and Android native apps using the Selenium WebDriver.
There are many other automation tools available in market to automate mobile native apps like MonkeyTalk, KIF, Calabash and Frank but most of those tools require an extra agent needs to be compiled with your application code so that the tool can interact with the mobile app. So here the problem is the app which you will be testing is not the same app which you will be submitting in the App Store as you would need to remove those automation agent libraries before submitting the app.
Automating hybrid and native mobile applications for Android and iOS is a key function handled by Appium, a node.js server. One of the core tenets of Appium is that test codes can be written in any framework or language like Ruby on Rails, C# and Java without having to modify the apps for automation purposes. The interaction between node.js server and Selenium client libraries is what ultimately works together with the mobile application. Appium is open source and can seamlessly run on a variety of devices and emulators making it an apt choice for mobile test automation.
1.2 Appium Architecture:
Appium is a HTTP server written in node.js which creates and handles multiple WebDriver sessions for different platforms like iOS and Android.
Appium starts a “test case” on the device that spawns a server and listens for proxies commands from the main Appium server. It is almost same as Selenium server which perceives HTTP requests from selenium client libraries and it handles those requests in different ways depending upon the platforms. Each vendor like iOS and Android have a different way and mechanism to run a test case on the device so Appium kind of hacks in to it and run this testcase after listening commands from Appium server.
1.3 How Appium works in iOS:
On iOS, Appium proxies command to a UIAutomation script running in Mac Instruments environment. Apple provides this application called ‘instruments’ which is used to do lot activities like profiling, controlling and building iOS apps but it also has an automation component where we can write some commands in javascript which uses UIAutomation APIs to interact with the App UI. Appium utilizes these same libraries to automate iOS Apps.

In the above figure, we can see the architecture of the Appium in context to the iOS automation. If we talk about a command life-cycle, it goes like, Selenium webdriver picks a command form the code like (Element.click) and sends it in form of JSon via http request to the Appium server. Appium server knows the automation context like the iOS and Android and sends this command to the Instruments command server which will wait for the Instruments command client (written in node.js) to pick it up and execute it in bootstrap.js with in the iOS instruments environment. Once the command is executed the command client sends back the message to the Appium server which logs everything related to the command in its console. This cycle keeps going till the time all the commands gets executed.
1.4 How Appium works in Android:
The situation is almost similar in case of Android where Appium proxies commands to a UIAutomator test case running on the device. UIAutomator is Android’s native UI automation framework which supports running junit test cases directly in to the device from the command line. It uses java as a programming language but Appium will make it run from any of the WebDriver supported languages.

In the above diagram we can see, here we have Bootstrap.jar in place of bootstrap.js which represents out test case when compiled in java. As soon as it gets launched it spawns a TCP server. Here the TCP server resides inside the device and client is in the Appium process which is just opposite to the way it is in iOS.
1.5 Appium’s Pros and Cons:
Pros:
· The beauty of Appium is that, all the complexities are under the hood of Appium server and for an automation developer the programming language and the whole experience would remain same irrespective of the platform he is automating (iOS or Android).
· The other benefits of Appium is that it opens the door to cross-platform mobile testing which means the same test would work on multiple platforms.
· Unlike other tools Appium doesn’t require you to include some extra agents in your app to make it automation friendly. It believes in the philosophy of testing the same app which we are going to submit in the app store.
· It is developed and supported by Sauce Labs and it is getting picked really fast with in the WebDriver community for mobile automation.
· It can automate Web, Hybrid and Native mobile applications.
Cons:
· Scaling up is an important consideration with Continuous Integration and Appium comes across as a great tool to fulfill this expectation. The reason for this is a technical limitation, in iOS we can only run one instance on Instruments per Mac OS so we can only run our iOS scripts on one device per mac machine. So if we want to run our tests on multiple iOS devices at the same time then we would need to arrange the same number of Mac machines, which would be costly affair. But this limitation can be resolved if we execute our scripts in Sauce Lab’s mobile cloud which at present supports running scripts on multiple iOS simulators at the same time.
· Appium uses UIAutomator for Android automation which only supports Android SDK Platform, API 16 or higher so to support the older APIs they have used another open source library called Selendroid. So, I would not say it as a limitation but it is an overhead on the configuration side.
2.Appium Setup and Configuration
2.1 Installation of Java Development Kit (JDK):
Visit the Java downloads page on Oracle’s website to find the JDK environment download. Scroll down until you find Java SE Latest Version and download JDK.
2.2 Installation of Android SDK (Android Studio):
Download the Android SDK Tools from here. Just go the the bottom of the page where you will find the text ‘Other Download Options‘ and go for ‘SDK Tools Only‘. Choose the downloadable file corresponds to your Operating System.
2.3 Installation of NodeJS:
Appium is an HTTP server written in node.js which creates and handles multiple WebDriver sessions for different platforms like iOS and Android. Automating hybrid and native mobile applications for Android and iOS is a key function handled by Appium, a node.js server. One of the core tenets of Appium is that test codes can be written in any framework or language like Ruby on Rails, C# and Java without having to modify the apps for automation purposes. The interaction between node.js server and Selenium client libraries is what ultimately works together with the mobile application. Visit the Node.JS website to download Node.JS. Scroll down little bit to find the correct installer for your OS version.
2.4 Installation of external dependencies:
External dependencies are:
2.4.1. brew install ideviceinstaller
2.4.2. brew install carthage
2.4.3. npm install -g ios-deploy
2.4.4. npm install -g deviceconsole
2.4.5. gem install xcpretty
2.4.6. brew install libimobiledevice --HEAD
2.4.7. brew install libimobiledevice
Note: To install HomeBrew, run this in command line: /usr/bin/ruby -e "$(curl –fsSL https://raw.githubusercontent.com/Homebrew/install/master/install)"
2.5 WebdriverAgent Configuration:
2.5.1. go to => node_modules/appium-xcuitest-driver/WebDriverAgent
2.5.2. mkdir =p Resources/WebDriverAgent.bundle
2.5.3. sh ./Scripts/bootstrap.sh –d
2.5.4. Open xcode with WebDriverAgent.xcodeproj
2.5.5. build WebDriverAgent project.
Note:
1. Select Team & certificaitons in Xcode as per your project
2. Build the project for WebDriverAgentRunner as well with the same Team and certifications
3. Build the .app file of your application which needs to be tested in the same device where you have build the above two points
4. Find the path of app from, by clicking on the WebDriverAgent-> File-> Project Settings -> under DerivedData.
2.6 Installation of APPIUM:
Run the below mentioned command in terminal:
Appium 1.7.2 from: sudo npm install -g appium@1.7 ( Or any version you want)
2.7 Environmental Setup:
For Mac systems, create or edit the bash_profile file from the command: (to edit: “touch .bash_profile" to create your new file. And to create: “open -e .bash_profile" to open it in TextEdit.) And then edit the Bash_profile with below mentioned path:
o export JAVA_HOME=/Library/Java/JavaVirtualMachines/jdk1.8.0_121.jdk/Contents/Home
o export ANDROID_HOME=/Users/siddtiwari28/Library/Android/sdk
o PATH=$PATH:/Library/Java/JavaVirtualMachines/jdk1.8.0_121.jdk/Contents/Home/bin
2.8 Installation of Eclipse:
Go to “http://www.eclipse.org/downloads”. Since Eclipse IDE does not have any installer, there will be a file inside the Eclipse folder named eclipse.exe. You can double click on the file to run Eclipse.
2.9 Installation of XCode:
Download and Install Xcode 8.3 or later version on mac with Command Line tools from Mac store or from https://itunes.apple.com/us/app/xcode/id497799835?mt=12 (Mac OS version should be 10.7+).
Building and running a Xcode project:
1. Open Xcode from “/Applications” folder
2. Click on Open Another Project.
3. Select iPhone version on which you want to install this app.
4. Build project using Xcode. This will generate the .app file.
5. code generates .app file which is used further in Appium settings for App Pathattribute. To do that open Mac terminal and type command open –a Finder ~/Library/Developer/Xcode/DerivedData/.
2.10 Installation of Selenium WebDriver:
Also download “Java client 5.0.0 Jar” from “https://mvnrepository.com/artifact/io.appium/java-client/5.0.0-BETA1”.
3. Appium Doctor
After installing everything mentioned above, open terminal/command prompt, type “appium doctor” to understand whether every package/jar is installed or not also environmental path is correct or not.
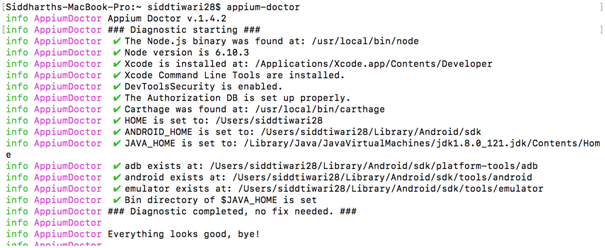
Since every check is Green and passed, we can proceed. However if something is failed then take corrective actions.
4. How to Inspect elements in Appium.
In appium version 1.6.4 GUI is not supported hence Appium inspefctor is not present. Now for automating any mobile app, one should have to have element locators to run the script. So, there is a workaround for it, install appium version 1.5.3 and we can use its inspector.
Follow the below mentioned steps to use inspector of appium version 1.5.3:
1. Download appium version 1.5.3 from “https://bitbucket.org/appium/appium.app/downloads/”.
2. Install the .dmg (for mac) file of appium.

1. Select android or iOS options as required. Then provide the required details under Basic and Advance settings:


1. Click on Appium Inspector icon. Before clicking on it, do start appium (1.7.2) server from terminal by just typing “appium”.


1. Copy the locators from details section.
5. TestNG Framework.
5.1 TestNG
TestNG is a testing framework inspired from JUnit and NUnit but introducing some new functionality that make it more powerful and easier to use.
It is an open source automated testing framework; where NG of TestNG means Next Generation. TestNG is similar to JUnit but it is much more powerful than JUnit but still it’s inspired by JUnit. It is designed to be better than JUnit, especially when testing integrated classes. Pay special thanks to Cedric Beust who is the creator of TestNG.
TestNG eliminates most of the limitations of the older framework and gives the developer the ability to write more flexible and powerful tests with help of easy annotations, grouping, sequencing & parametrizing.
5.2 Benefits of TestNG:
There are number of benefits but from Selenium perspective, major advantages of TestNG are:
1. It gives the ability to produce HTML Reports of execution
2. Annotations made testers life easy
3. Test cases can be Grouped & Prioritized more easily
4. Parallel testing is possible
5. Generates Logs
6. Data Parameterization is possible
5.3 Test Case Writing:
Writing a test in TestNG is quite simple and basically involves following steps:
Step 1 – Write the business logic of the test
Step 2 – Insert TestNG annotations in the code
Step 3 – Add the information about your test (e.g. the class names, methods names, groups names etc…) in a testng.xml file
Step 4 – Run TestNG.
5.4 Annotations in TestNG:
· @BeforeSuite: The annotated method will be run before all tests in this suite have run.
· @AfterSuite: The annotated method will be run after all tests in this suite have run.
· @BeforeTest: The annotated method will be run before any test method belonging to the classes inside the tag is run.
· @AfterTest: The annotated method will be run after all the test methods belonging to the classes inside the tag have run.
· @BeforeGroups: The list of groups that this configuration method will run before. This method is guaranteed to run shortly before the first test method that belongs to any of these groups is invoked.
· @AfterGroups: The list of groups that this configuration method will run after. This method is guaranteed to run shortly after the last test method that belongs to any of these groups is invoked.
· @BeforeClass: The annotated method will be run before the first test method in the current class is invoked.
· @AfterClass: The annotated method will be run after all the test methods in the current class have been run.
· @BeforeMethod: The annotated method will be run before each test method.
· @AfterMethod: The annotated method will be run after each test method.
· @Test: The annotated method is a part of a test case.
5.5 Benefits of using Annotations:
1. It identifies the methods it is interested in by looking up annotations. Hence method names are not restricted to any pattern or format.
2. We can pass additional parameters to annotations.
3. Annotations are strongly typed, so the compiler will flag any mistakes right away.
4. Test classes no longer need to extend anything (such as Test Case, for JUnit 3).
6. How to set Desired Capabilities
Desired Capabilities is a way of telling the Appium Server which kind of session we are interested in. So it's a hash of Key and Value to let us have more control on the server during automation. So some of the key info which we will be using are :
1. automationName: Which automation engine to use (appium default or selendroid)
2. platformName: which mobile OS platform to use (iOS,Android or FirefoxOS)
Similarly, we can specify platformVersion which will be the version of OS running on the device, could be "8.3" or "5.1".
7.Sample Script
Without TestNG:

With TestNG:

Thank you for sharing this wonderful information.
ReplyDeleteMobile Testing training in Chennai | Mobile Testing Training
I had got a clear idea of what the blog is all about. Kindly continue doing more.
ReplyDeleteTOEFL Coaching Centres in Chennai
TOEFL Centres in Chennai
TOEFL Coaching Classes in Chennai
TOEFL Course in Chennai
IELTS Coaching in Chennai
Spoken English Classes in Coimbatore
Spoken English Class in Ambattur
Spoken English Classes in Bangalore
Spoken English Classes in Anna Nagar
I am really enjoying reading your well written articles.
ReplyDeleteIt looks like you spend a lot of effort and time on your blog.
I have bookmarked it and I am looking forward to reading new articles.Keep up the good work..
RPA Training in Chennai
RPA Classes in Chennai
Blue Prism Training in Chennai
Ethical Hacking Training in Chennai
Cloud Computing Training in Chennai
RPA Training in T Nagar
RPA Training in Porur
Subscription boxes are a type of boxes which are delivered to the regular customers in order to build goodwill of the brand. They are also a part of the product distribution strategy. As a woman, you should subscribe to these boxes to bless yourself with a new and astonishing box of happiness each month. visit mysubscriptionsboxes
ReplyDeleteIt is really an awesome blog with lot of information. Just it is mind blowing.
ReplyDeleteAngularJS training in chennai | AngularJS training in anna nagar | AngularJS training in omr | AngularJS training in porur | AngularJS training in tambaram | AngularJS training in velachery